About
How does KREECHAT work?
USER GUIDE
KREECHAT
What is Kreechat?
Kreechat is a software that puts all the messages that you receive from your social medias (WhatsApp, Telegram and Viber) neatly into one place. It allows you and your team (agents) to respond to each received chat in an organized way. The software also offers advanced statistics about your team’s response time, total messages and stores information about your clients. Kreechat offers full management of your agents, giving you more control over the whole process.
How does it work?
This user guide aims to provide Kreechat operators with all the necessary information related to the agent features that exist within this software. The images provided correspond to the version of the software that is mentioned in the first page of this document.
Kreechat operators are advised to refer to this document first before opening a support ticket, as it explains all provided features. It is often quicker to solve a problem using this guide, than to open a support ticket and wait for a response.

TICKETS AND TICKETING SYSTEM
The main feature of Kreechat is the ticketing system. It gives operators the ability to respond to customers that have opened a support ticket through any of the supported platforms.
RECEIVING TICKETS
A support ticket is opened any time the company is messaged through a supported platforms.
Supported messaging platforms as of the version stated in the cover page:
- Telegram
- Viber
- Messenger
When a ticket is created it is followed by an audible sound, that alerts all online agents.
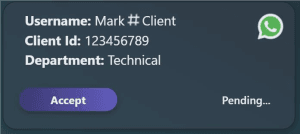
The new ticket contains the customer’s chosen username, their client identifier (Client Id), the department they have been redirected to, the platform they used to open the ticket, the current ticket status and the Accept button. A ticket can be accepted if the status of the ticket is Pending.
Once a ticket is accepted, its status automatically changes to ‘Accepted by:’ followed by the name of the agent handling the ticket. The hash symbol (#) is a button that operators can use to record notes related to the customer for future reference.
ACCEPTING TICKETS
A ticket can be accepted by clicking the ‘Accept’ button, provided no agent is currently handling it. Multiple agents cannot manage the same ticket simultaneously. If another agent needs to respond to a ticket, it must be reassigned to them.
When a ticket has been accepted the chat window should become available. Revealing multiple options.

REASSIGNING TICKETS
An accepted ticket can be reassigned to a different agent when necessary. To do this the agent that has accepted the ticket must click on the Reassign button on the top right of the chat window.

After clicking on the Reassign button, a window should pop out with the available departments and agents that the ticket can be reassigned to.
By using the reassign ticket window one of three main choices may be selected:
1. Reassign to another department – By only selecting the department and clicking the Reassign.
2. Reassign to another agent – By selecting the department then selecting an agent from the list and clicking the Reassign.
3. Cancel reassignment – By clicking on the Cancel button the reassignment of the ticket is terminated.
CLOSING TICKETS

Closing a ticket triggers an automatic chain of events:
1. Ticket becomes invisible – Once closed, the ticket becomes invisible and the conversation is hidden from the ‘Pending Tickets’ menu.
2. Ticket chat becomes unavailable – When a ticket has been closed all communication with the customer through Kreechat is not possible, except if the customer opens another ticket.
3. Customer receives automated response – The customer immediately receives an automated response that informs them of the ticket closure.
4. Customer may leave a rating – Closing the ticket gives the customer the opportunity to leave a rating on the quality of the received support. The rating spans from one to three stars.
VIEWING CLOSED TICKETS
Operators of Kreechat can view closed tickets through the left ticket menu, by clicking on the message bubble icon, in the tickets section located on the left side of the chat window.

Closed tickets cannot be interacted with. Their function is only to provide information about the chat that has taken place, the name of the agent that closed the ticket, when it was closed and if the client has left a rating.
TICKET SEARCH
Agents can search for opened or closed tickets by specific keywords related to that ticket, such as: username, client id, reference note, department or current assigned agent (for opened tickets only).
To search for a ticket an agent needs to click on the magnifying glass icon that is located next to the message bubble icon [6] in the tickets section located on the left side of the chat window.

An input bar should appear, that enables the agent to search for open or closed tickets by entering a search keyword and pressing the “ENTER” button on the keyboard or clicking on the magnifying glass icon located inside the search input field.
MESSAGES AND MESSAGING SYSTEM
The assigned ticket agent can send and receive messages from the customer that they are currently servicing. Customers can send images, videos, voice recordings, location, replies and reacts, which will all be displayed in the chat box. The customer’s messages are on the left side of the chat box.
SENDING MESSAGES
Using the input field on the bottom of the page, the ticket handling agent can send messages to the customer. Messages can be sent by clicking on the “ENTER” key or on the rightmost arrow.
![]()
RESPONSE BUBBLES
Response bubbles are a core Kreechat functionality that lets the support agent send predefined responses to customers. This eliminates the need to copy and paste response text. The responses can be viewed by clicking on the chat bubble icon, that is located next to the arrow button.

After clicking on the chat bubble icon, if there are created responses, a menu with all created responses will popup. When the menu is opened, a response can be selected by clicking on the title of the response bubble.
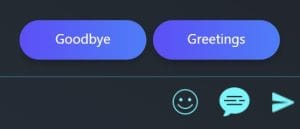
After clicking on the response bubble and selecting a specific phrase, the predefined text should appear in the input field.
![]()
The message can be sent as usual.
ATTACHING FILES
Files can be sent through Kreechat to the customer being serviced by clicking on the paper clip icon on the leftmost corner of the chat input.

After clicking on this icon, a popup of the file system will appear. Select the file that needs to be sent to the customer. After selecting it, it will be sent automatically.
TYPES OF MESSAGES
There are different types of messages that can be seen inside the chat box.
TEXT MESSAGE

This is a basic customer message, it can be much longer than this, up to 5000 characters. The bottom right corner shows the hour this message was sent.
SYSTEM MESSAGES
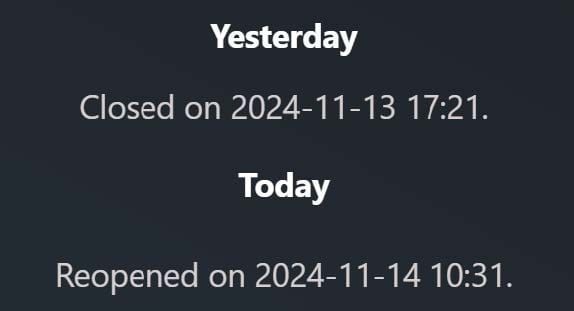
The figure above, shows automatic informational messages created by the system when a ticket has been closed or reopened (in gray). It can be used to keep track of a ticket’s history and the number of times it has been reopened. The text in white is used to show the day when the interaction took place.
CUSTOMER RATING

After a ticket has been closed the customer can leave a rating, from one to three stars, one being the worst and three being the best.
LOCATION

Location message. By clicking on the Google Maps button, a new tab will open with the exact location sent by the customer.
VOICE MESSAGE
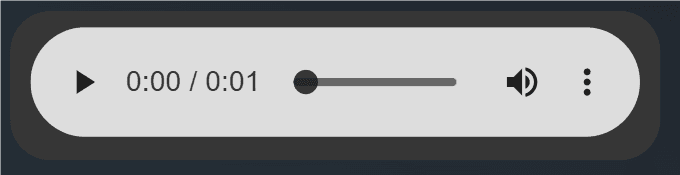
Customer voice messages can be played by clicking on the leftmost triangle button. To control the volume of the message adjust it using the speaker button. To download the voice recording, or to change the speed of the playback click on the rightmost button with the three horizontal dots.
DOCUMENT OR FILE
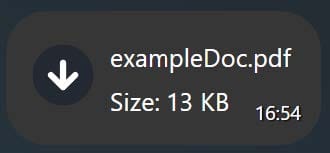
To download file messages, click on the arrow pointing down button. The downloading should start automatically. Afterwards, the file can be accessed on your device’s file system.
IMAGES AND VIDEOS
PINNED MESSAGES
Pinned messages are messages that can be easily accessed by any agent that is currently handling the specific ticket. They are useful when there is important information that needs to be readily available to anyone handling the ticket. Pinned messages can be accessed by clicking on the pin button.

After clicking on the pin button, a new menu should pop up, that contains a list of all pinned messages. Click on the message to scroll up to it.
To pin or unpin a message, right click on it and press the “Pin Message” or “Unpin Message” text.
It is recommended to check the pinned messages after accepting a ticket, so that any important information is known beforehand.
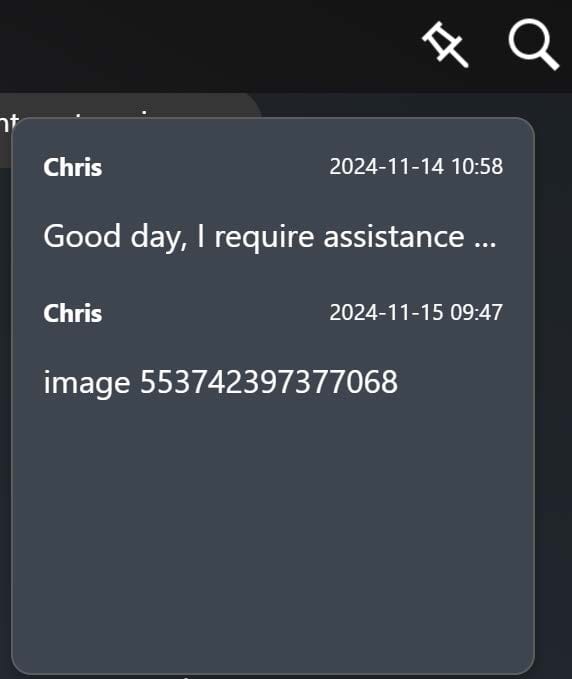
MESSAGE SEARCH
The agent that is handling the ticket can search for a specific message using a certain keyword. Click on the magnifying glass on the top right of the chat box to initiate a search.
![]()
After clicking it, a search input field should appear on the top of the chat. Enter a search keyword inside.

It should automatically find all messages containing the keyword.

A smaller field will appear below the search input, showing the total amount of words that match the keyword entered in the search input. The left and right arrow can be used to scroll through the found messages.
CHAT SCROLL DOWN

Press the automatic scroll down button, to scroll down to the bottom of the ticket chat box.
NOTIFICATIONS AND NOTIFICATION SYSTEM
To inform online agents of important events Kreechat has a notification system in place. It involves visual and auditory elements that aim to grab the attention of the Kreechat operators.
INCOMING TICKET NOTIFICATION
When a new ticket is received, the agents are informed using an audible sound. If they are using a browser and are on another tab, the Kreechat tab’s title starts changing, to further grab the attention of the agent. The received ticket should have an orange border on it to indicate that it is new and should be handled.
NEW MESSAGE NOTIFICATION
When an agent is assigned to a ticket, any time the user messages the agent, a chat notification should be heard, indicating that a new client message has been received.
NATIVE DEVICE NOTIFICATION
Device notifications are shown by the agent’s device system when the browser is given access to show them. Explicit permission must be given to use device notifications.
Press on the bell icon on the top menu to enable this feature.
![]()
NOTIFICATIONS INBOX
The notification inbox, located on the top right of the page, is used to view past notifications that were missed, while the agent was offline.

It notifies agents about client ratings and messages from other agents.
AGENT CHAT
On the right side of the Kreechat website, there is a list of agents. This list represents all agents that are currently offline or online (green or red dot).

To send a message to an agent, click on their name. A small chat box will open.

By using the bottom input box, an agent can send a message to another agent. If an agent who is offline receives a message from another agent, they will see this notification in their inbox.
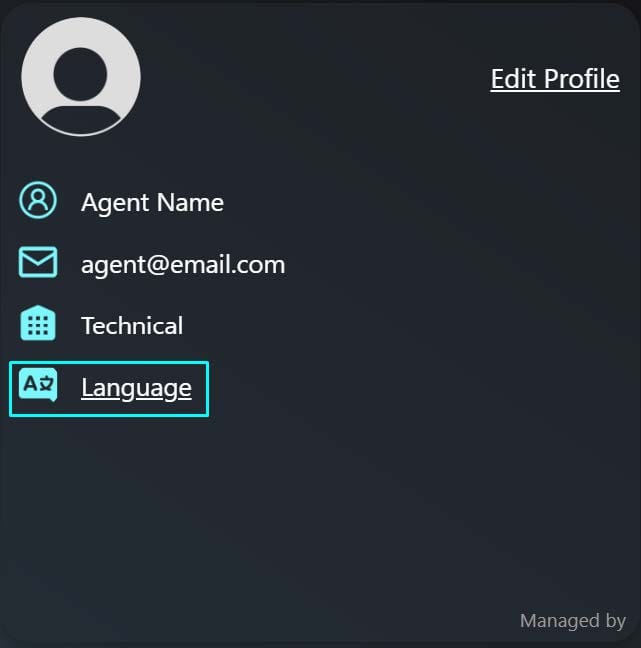
AGENT PROFILE
All users in Kreechat have their own personalized profile. They can access it by clicking on the “Person” icon on the top center menu.

PROFILE CUSTOMIZATION
After clicking on the “Person” icon, the agent is relocated to their own personal profile. They can add their profile picture and edit their details, by clicking on the Edit Profile text.
CHANGE LANGUAGE
Kreechat supports multiple languages, to change the language click on the Language text, inside the profile menu.
Afterwards, select a language, the text of the whole website should change to the selected language.
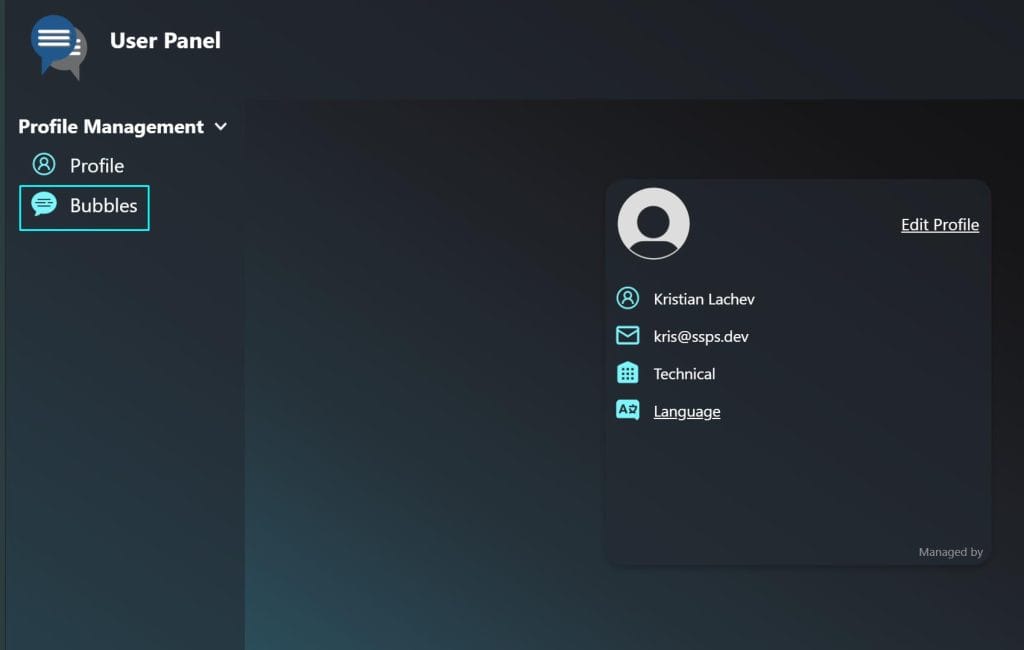
ADD RESPONSE BUBBLES
To add custom response bubbles, enter the agent profile page and click on the Profile Management text in the top right sidebar and click on the Bubbles text.
Add a bubble, by clicking on the input field, in the Create section. Add the name of the bubble in the input field and fill in the content that you want to automate and send.

After you fill in the bubble name and content, click on the Submit button on the bottom of the window.

LOGGING OUT
For security purposes, it is advised to log out of the application when you are not using it and not on your device. Agents are logged out automatically every 24 hours. To log out of the application, click on the arrow button, on the top center menu.

If you log in from another device your current session will be terminated, and you will log out from any other device you are logged in from.